
A friendly walk-through of the app, written for parents and caregivers — not for tech experts.
Contents
- Welcome
- First-run guided setup
- What your child sees
- Make your own panels
- Common problems
- Parent configuration
- Two ways to open Settings
- Three modes — pick one
- Rename a built-in panel or word
- Choose a language
- Set a parent password (PIN)
- Show Words Under Pictures
- Parent Access — how the gear shows up
- Keep the screen on while my child uses iInteract
- Lock the app for your child (Guided Access)
- Use it on more than one device
- Erase All My Data
- Privacy
- More help
Welcome
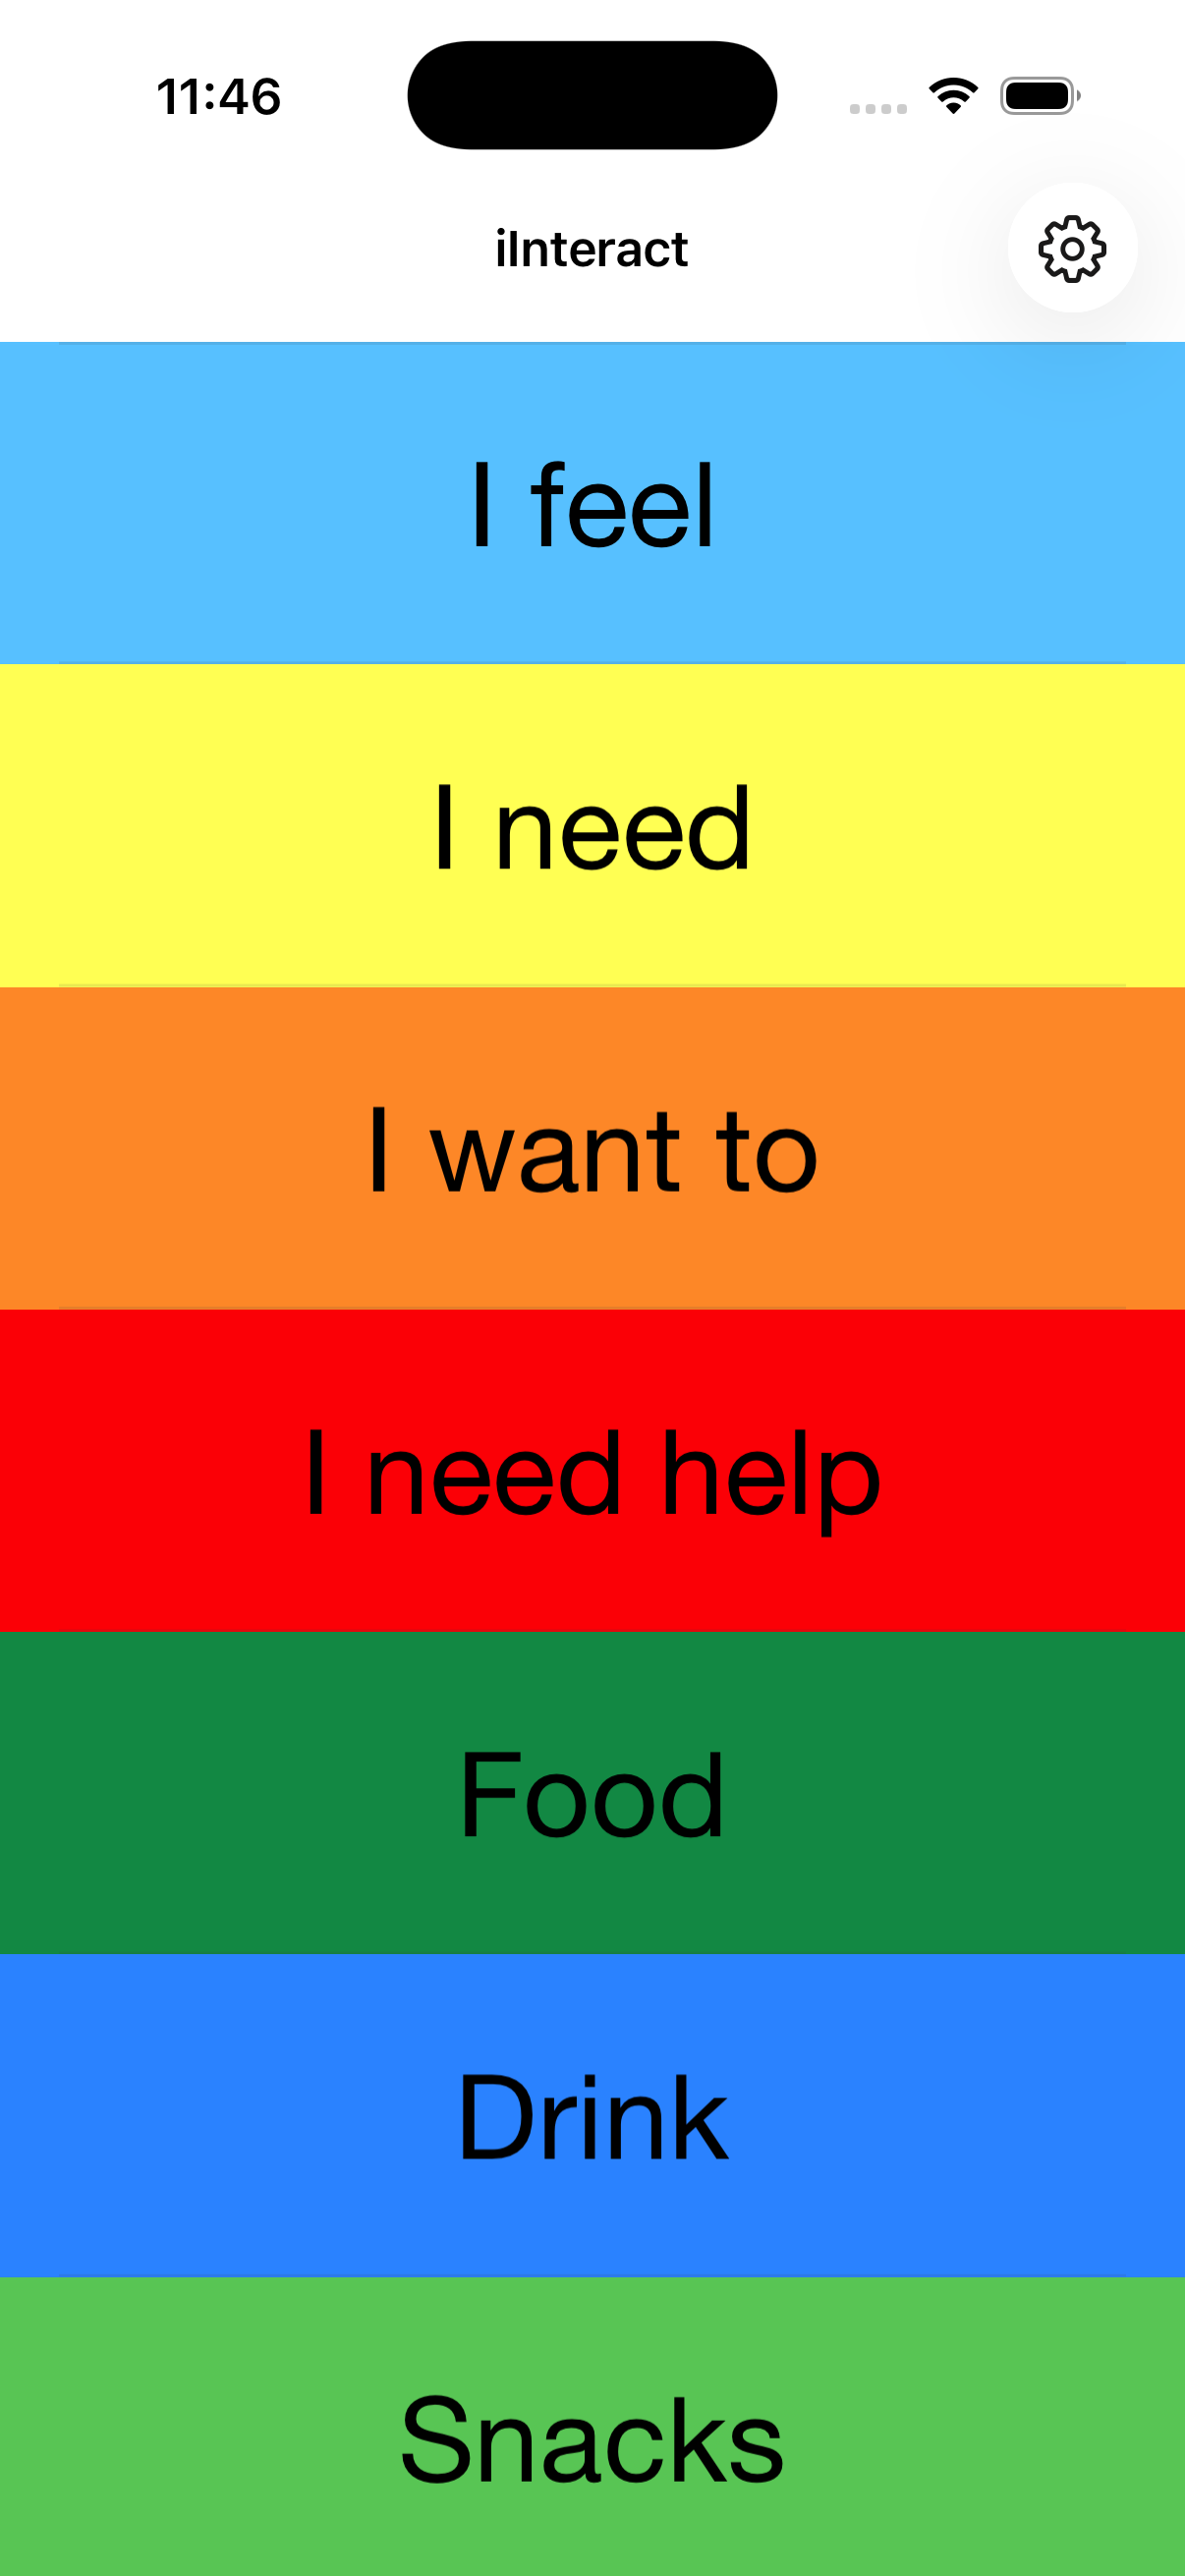
iInteract helps a child communicate by tapping pictures that speak words out loud. The app comes with seven ready-made sets of pictures (called panels) covering things like feelings, needs, and everyday activities.
If you want, you can also add your own pictures and record your own voice. That part is the most powerful — but you don’t have to use it.
It works on iPhone, iPad, and Mac. It’s free, and nothing tracks your child.
First-run guided setup
New in v3.5: the very first time you open iInteract, a short guided setup wizard walks you through the handful of choices that matter most. It replaces the old string of separate pop-ups with one friendly, step-by-step flow. You can change every one of these choices later in Settings — nothing here is permanent.
Tap Next to move through the pages:
- Welcome — a quick hello (and, if you’re upgrading, a “What’s New” note about this version).
- Voice — pick the Boy or Girl voice for the built-in panels. Girl is the starting choice. Tap the ▶ preview to hear each one before you decide.
- Show Words Under Pictures — choose whether each picture shows its word printed underneath. It’s on to start (helps early readers). See Show Words Under Pictures below.
- Mode — pick Default, Configurable, or Customize. Fresh installs start in Customize so you can add your own panels right away. See Three modes.
- PIN — set a 4-digit parent password now, or tap to skip and set one later. (If you already had a PIN, it’s kept as-is — the wizard never overwrites it.)
- Parent Access — choose how you reach parent settings: Long-Press Title (recommended — gear hidden in kid view; long-press the title to unlock) or Always Show Gear. Either way, Edit Mode auto-locks back to kid view after 10 minutes. See Parent Access.
- Privacy & sync (iPhone, iPad, and Mac only) — keep your panels synced across your devices through your private iCloud, or choose This device only. If you pick local-only, the app warns you that data won’t be backed up to iCloud or shared with your other devices.
- All Set — a finish page. Your choices are saved all at once when you tap the final button.
Upgrading from an earlier version? The wizard pre-fills every page with your current settings, so you can simply tap through and confirm. And depending on the version you’re coming from, you may only see the Welcome / What’s New page (and, for some upgraders, the Show Words page) rather than the full set.
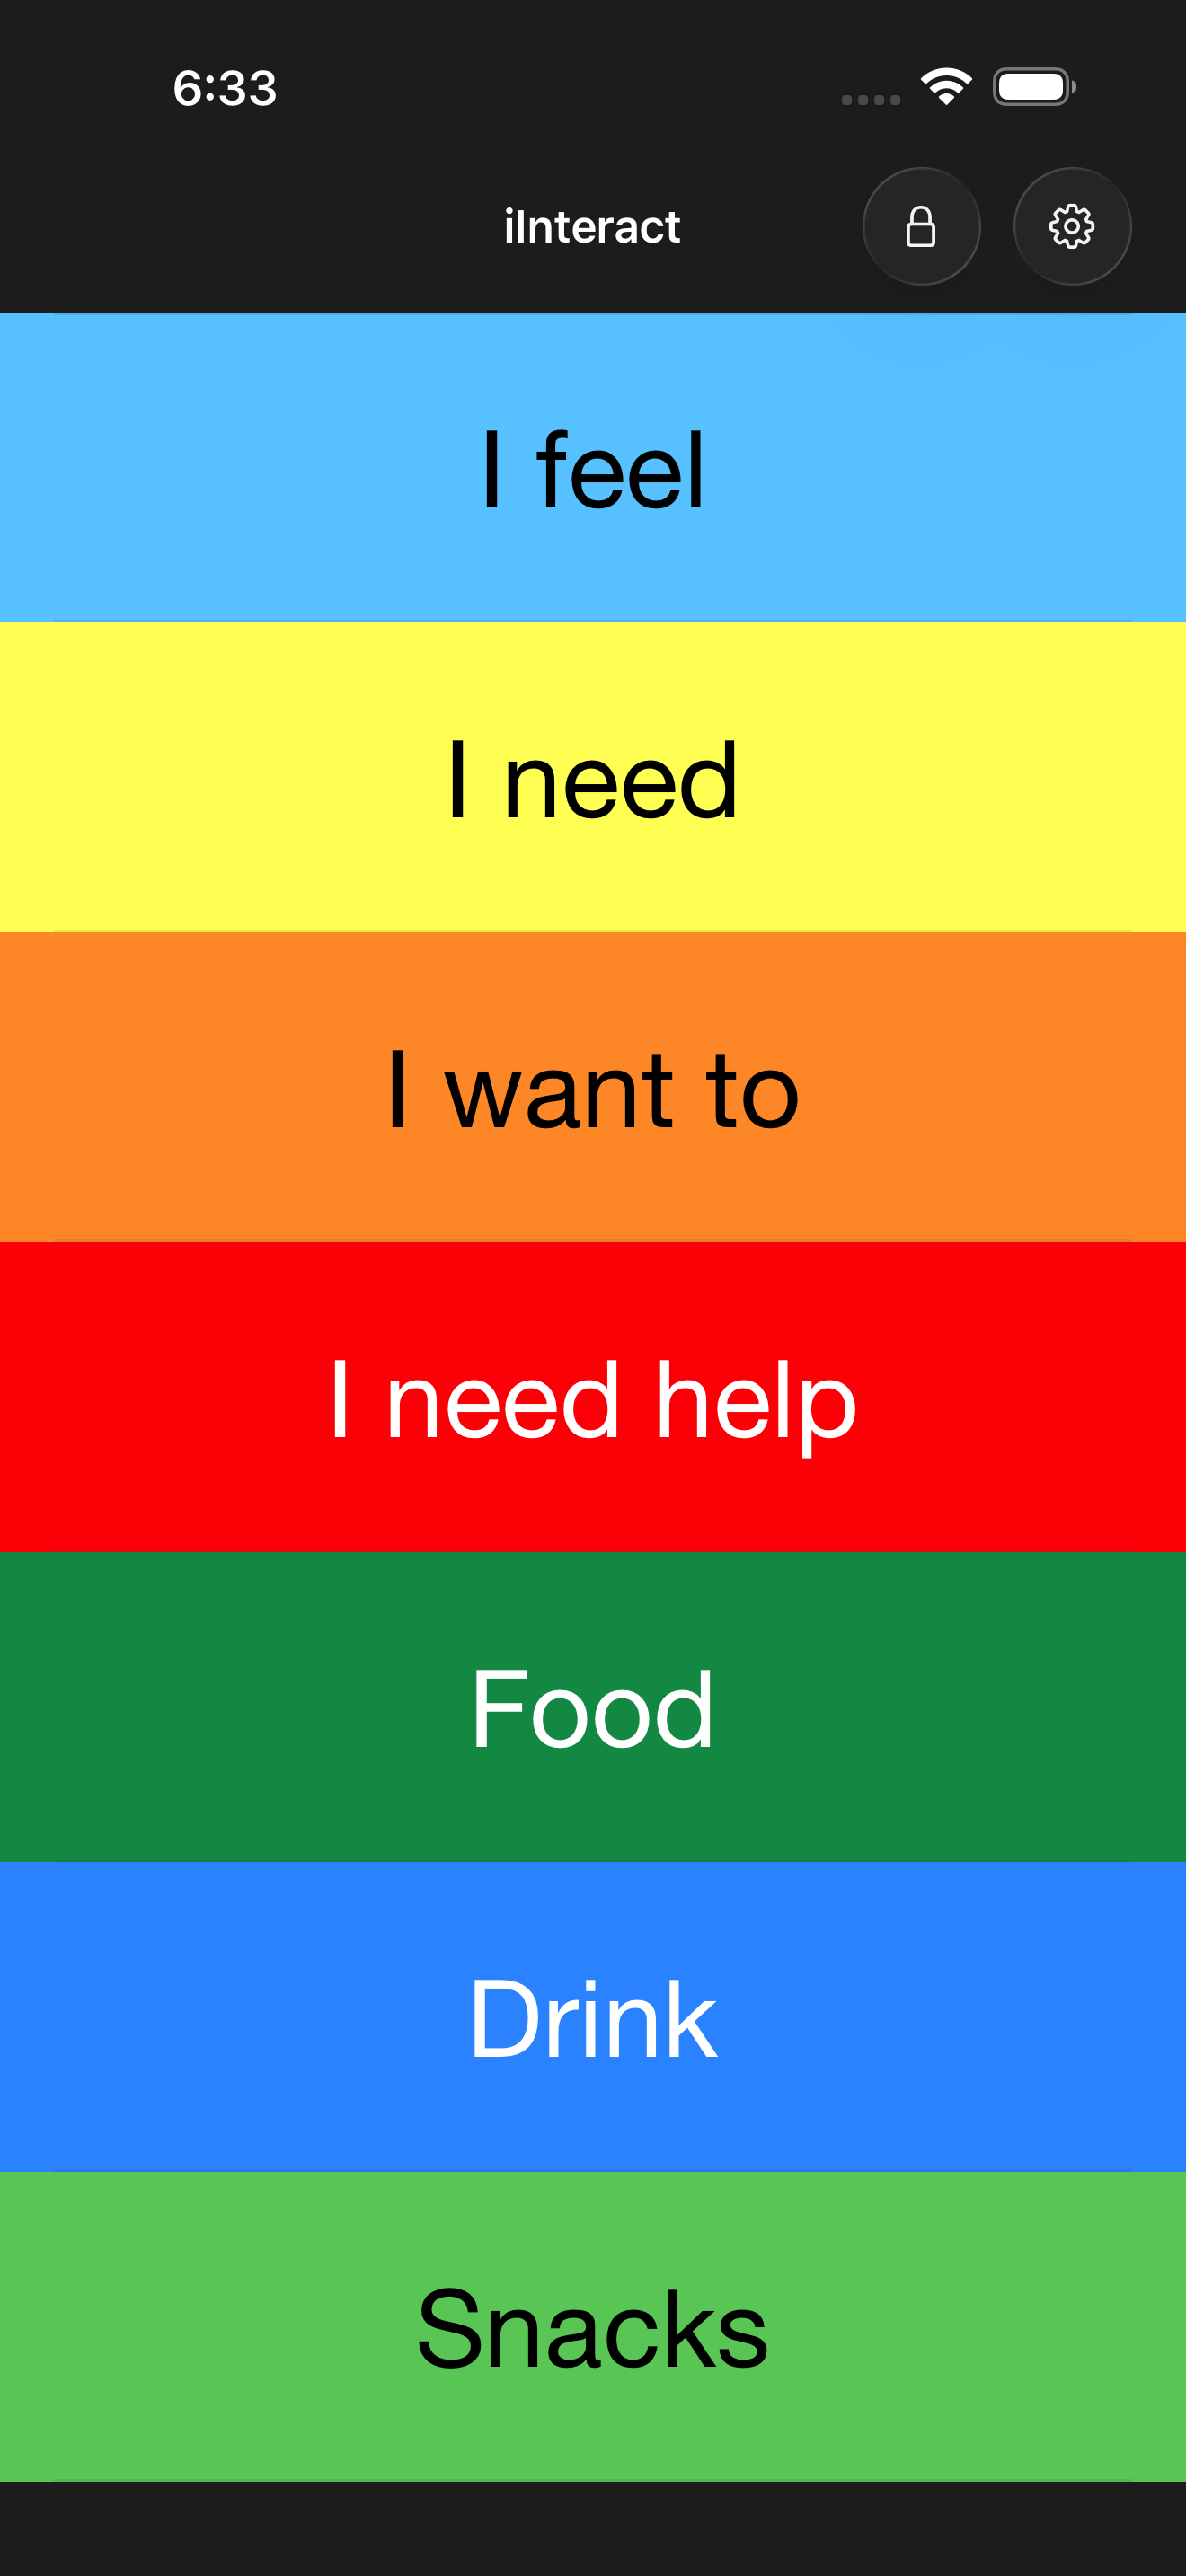
What your child sees
When you hand your child the iPhone:
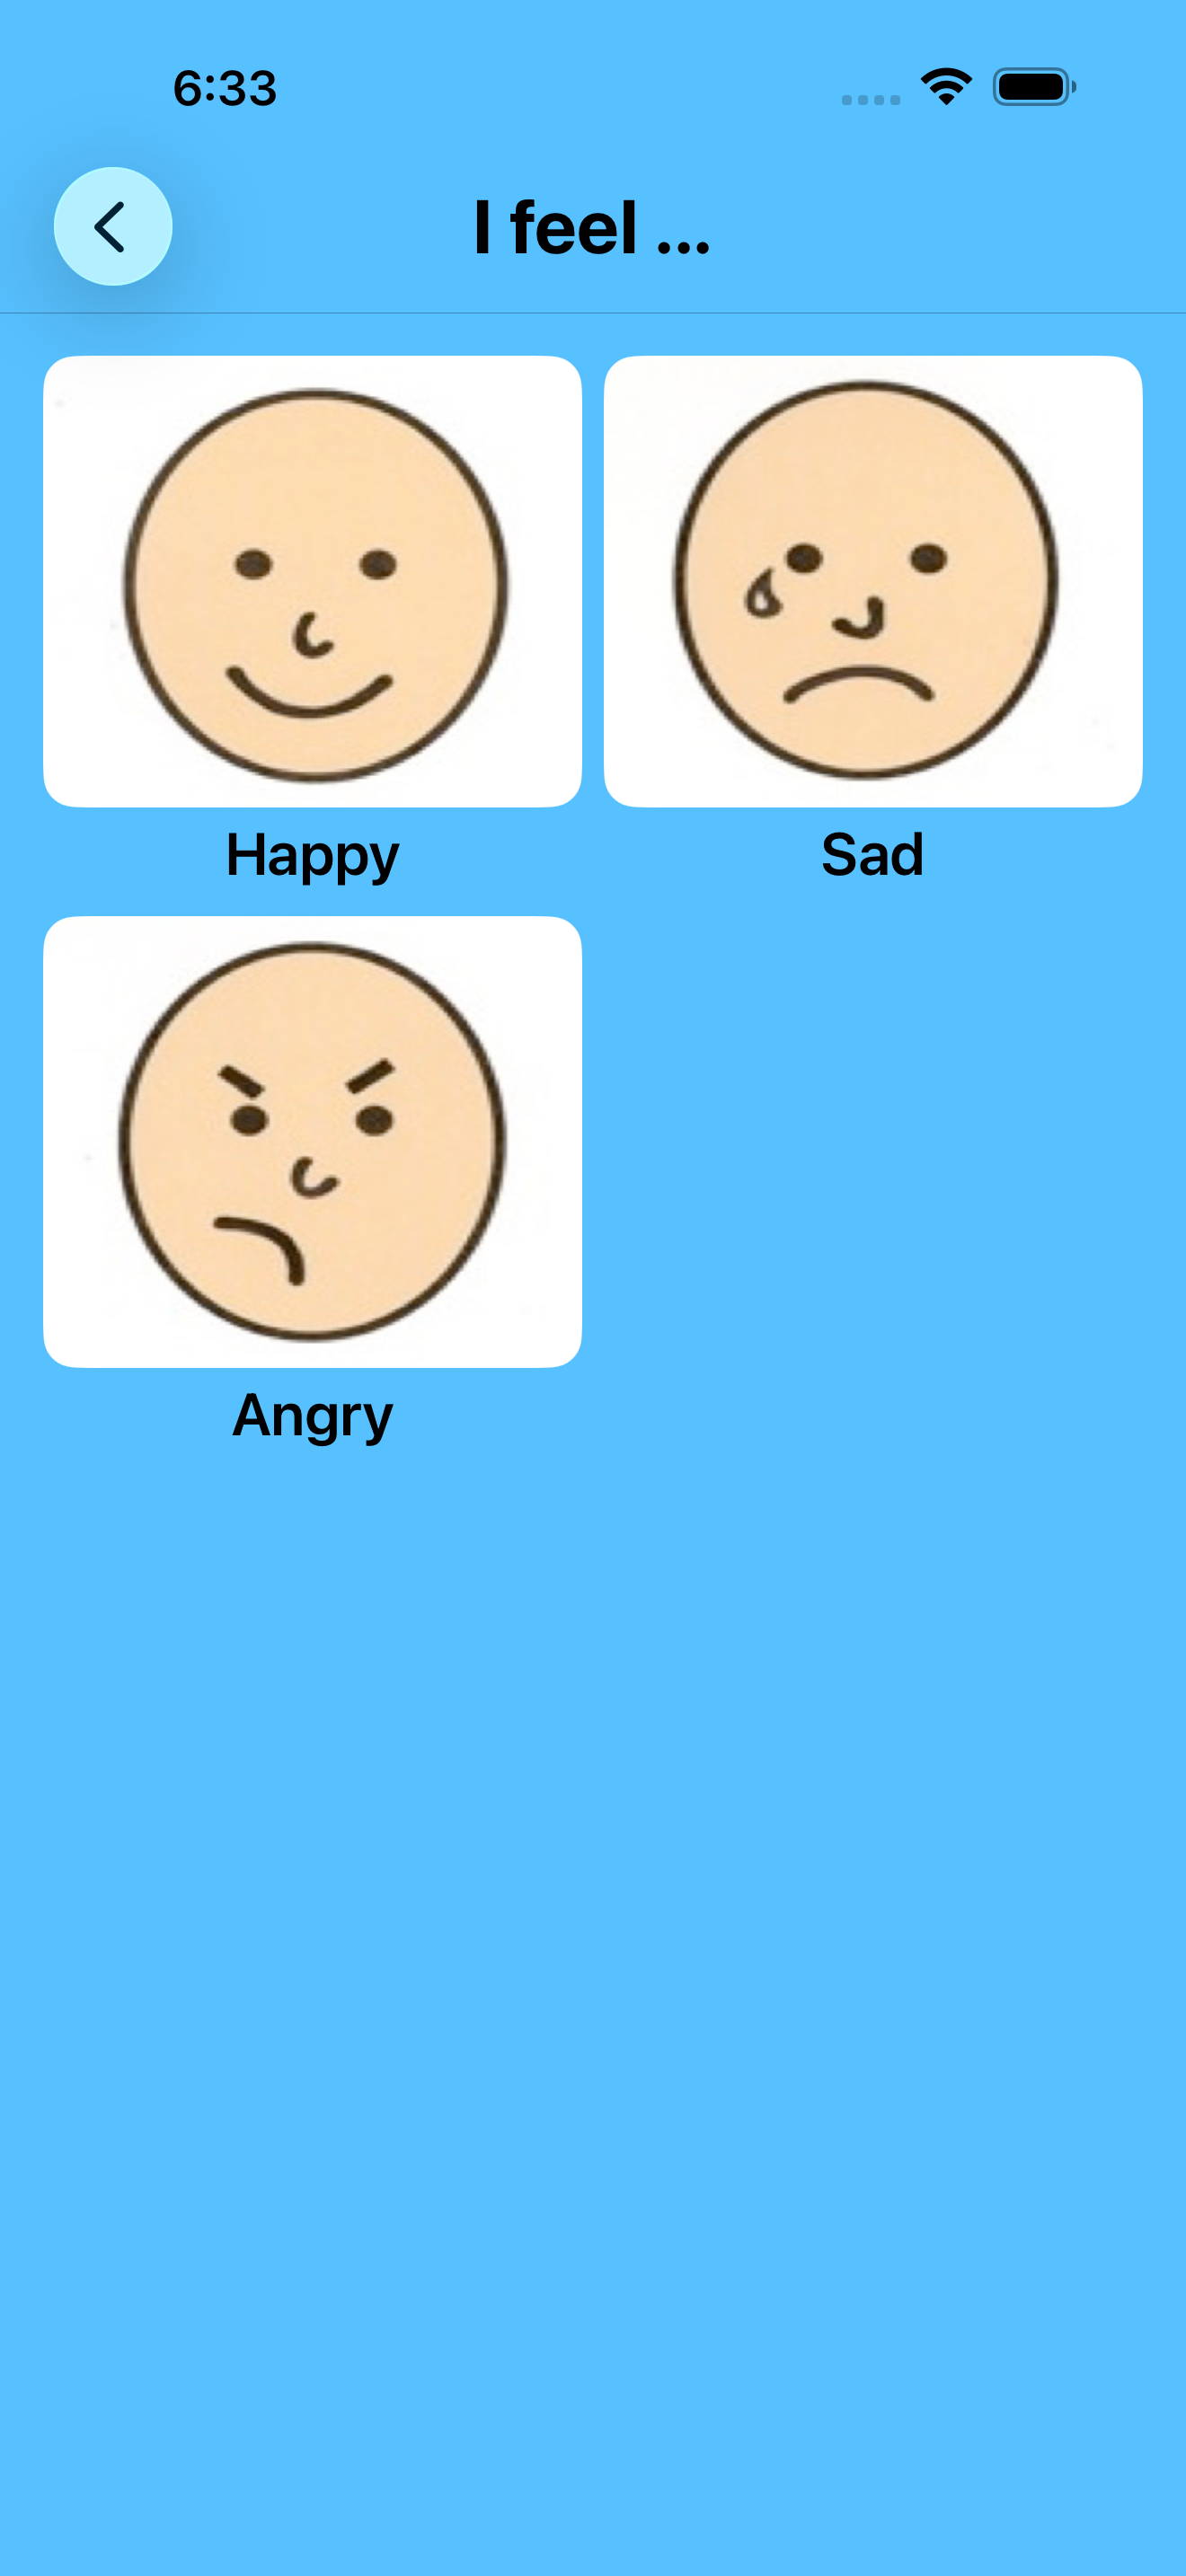
- They tap a colored panel — for example, “I feel”.
- They see a few pictures.
- They tap a picture, and the app says the word out loud.
- They tap Back to return to the main screen.
That’s it. No menus, no settings, no buttons that delete things. Out of the box, your child can’t change anything.
Apple Watch: if you have one paired to your iPhone, the built-in panels also work on the watch — handy for quick out-of-the-house communication. Works on Apple Watch running watchOS 10.4 or later. Custom panels you make stay on the iPhone and iPad.
Make your own panels (Customize mode only)
This is the most useful part of the app for many families. You can make panels using photos of grandparents, your child’s bedroom, favorite snacks, anything they need to communicate about. You record the words yourself in your own voice.
Step 1 — Open the editor
- On the main screen, tap the gear icon in the top-right.
- Type your PIN.
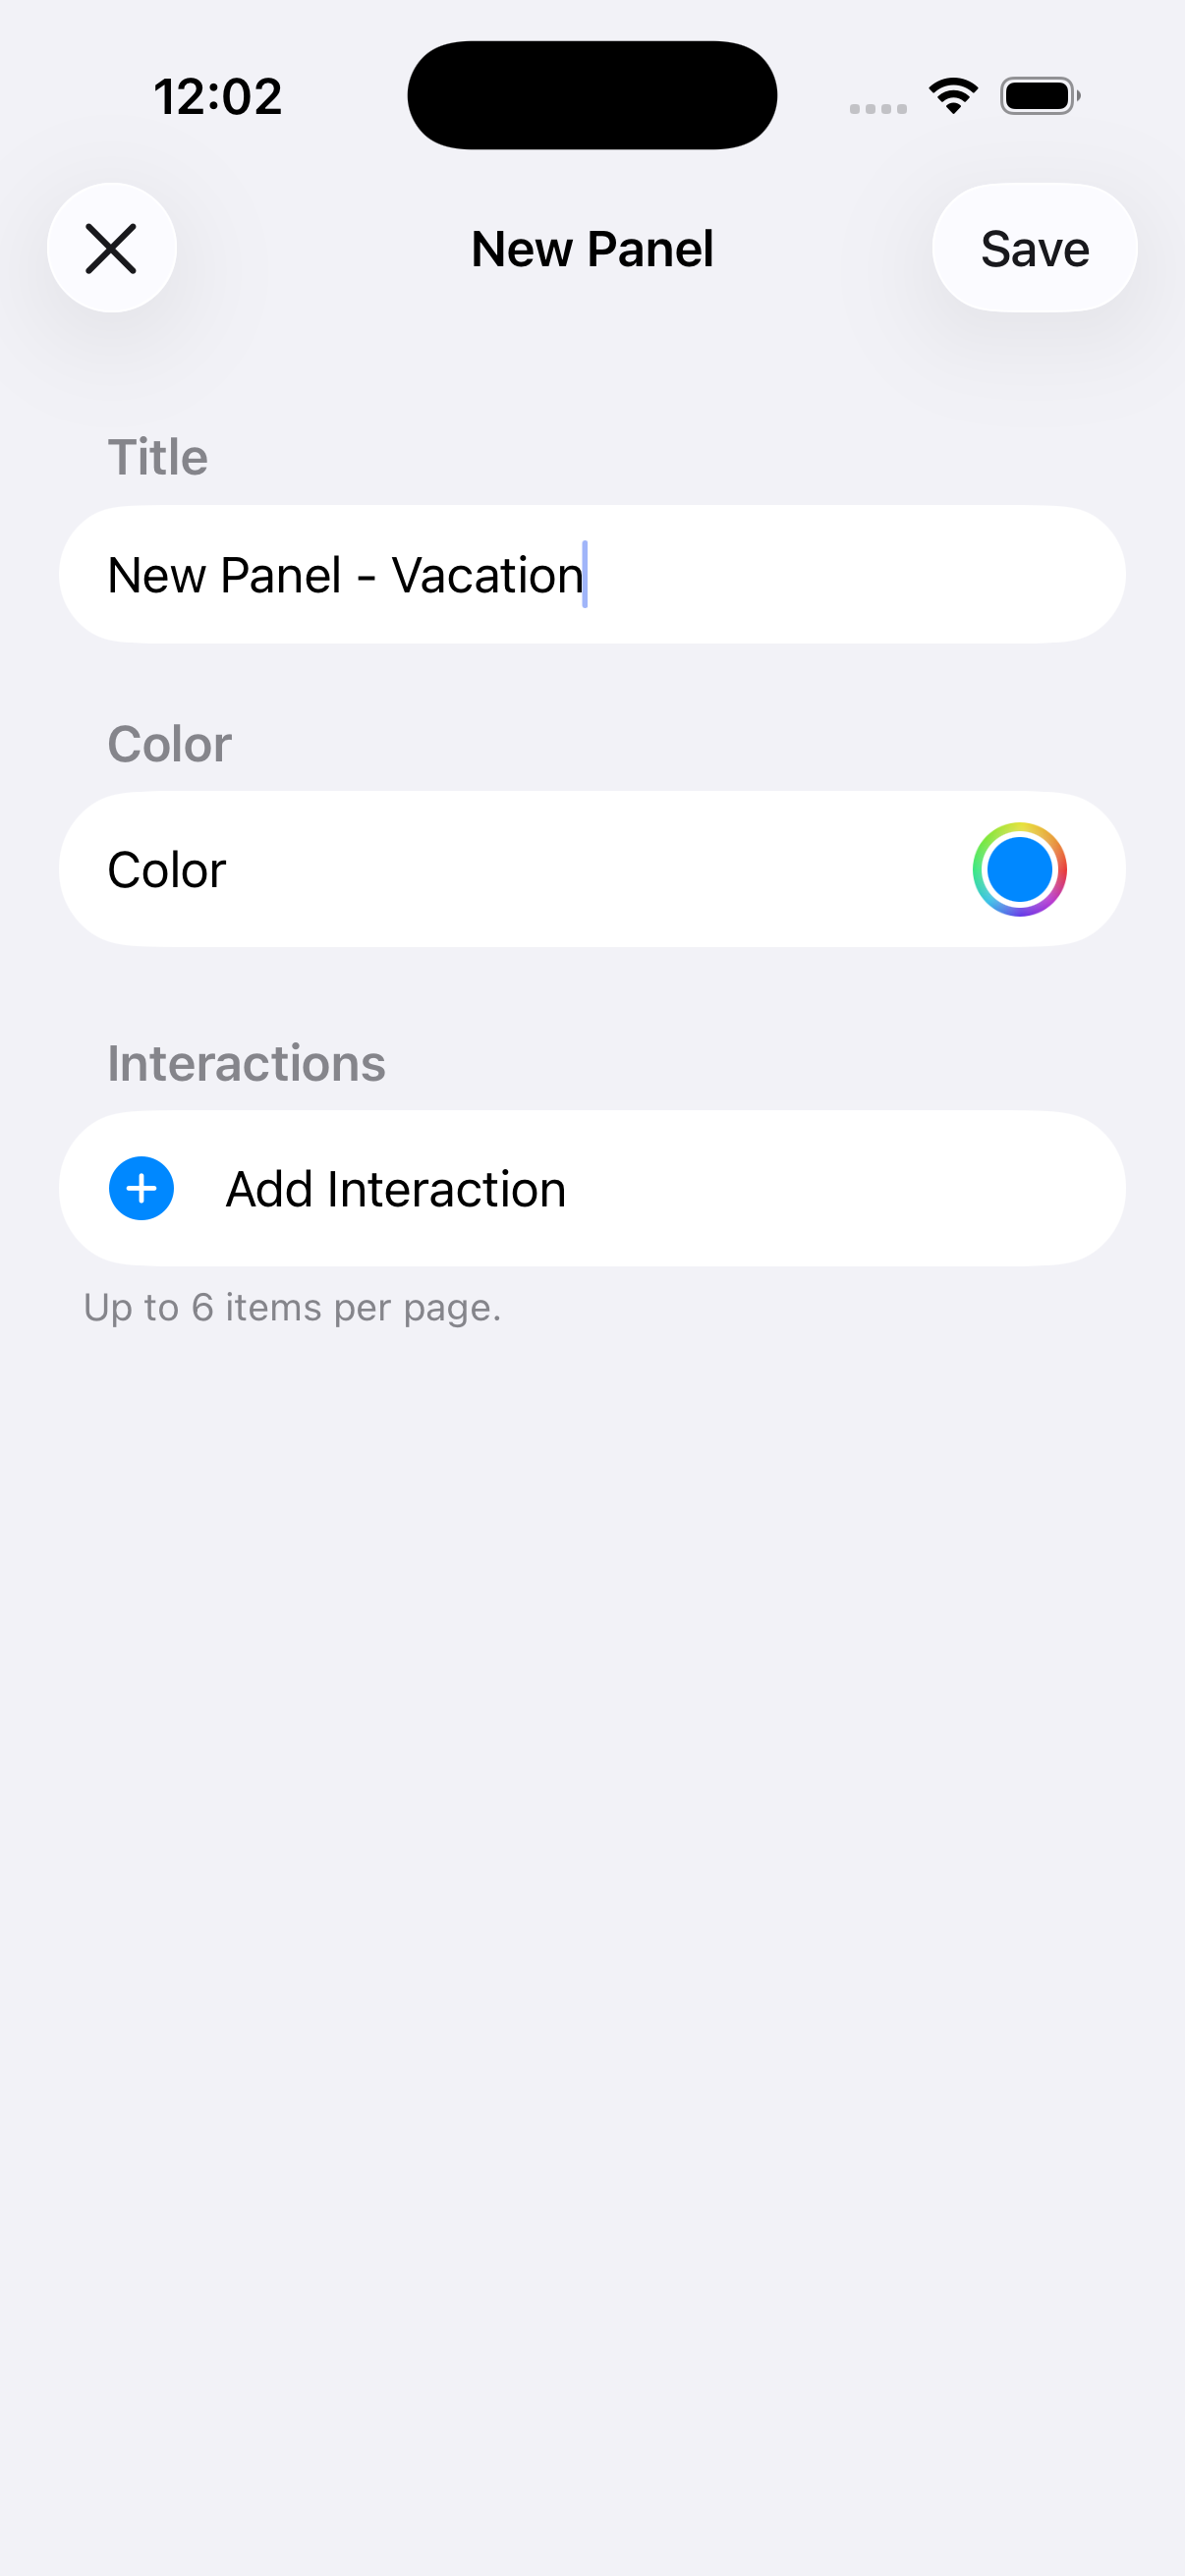
Step 2 — Add a new panel
- Tap + in the top-right.
- Type a Title — for example, Family.
- Tap the colored Color circle and pick any color you like.
- Tap Add Interaction to start adding pictures (next step).
- When you’re done adding pictures, tap Save in the top-right.
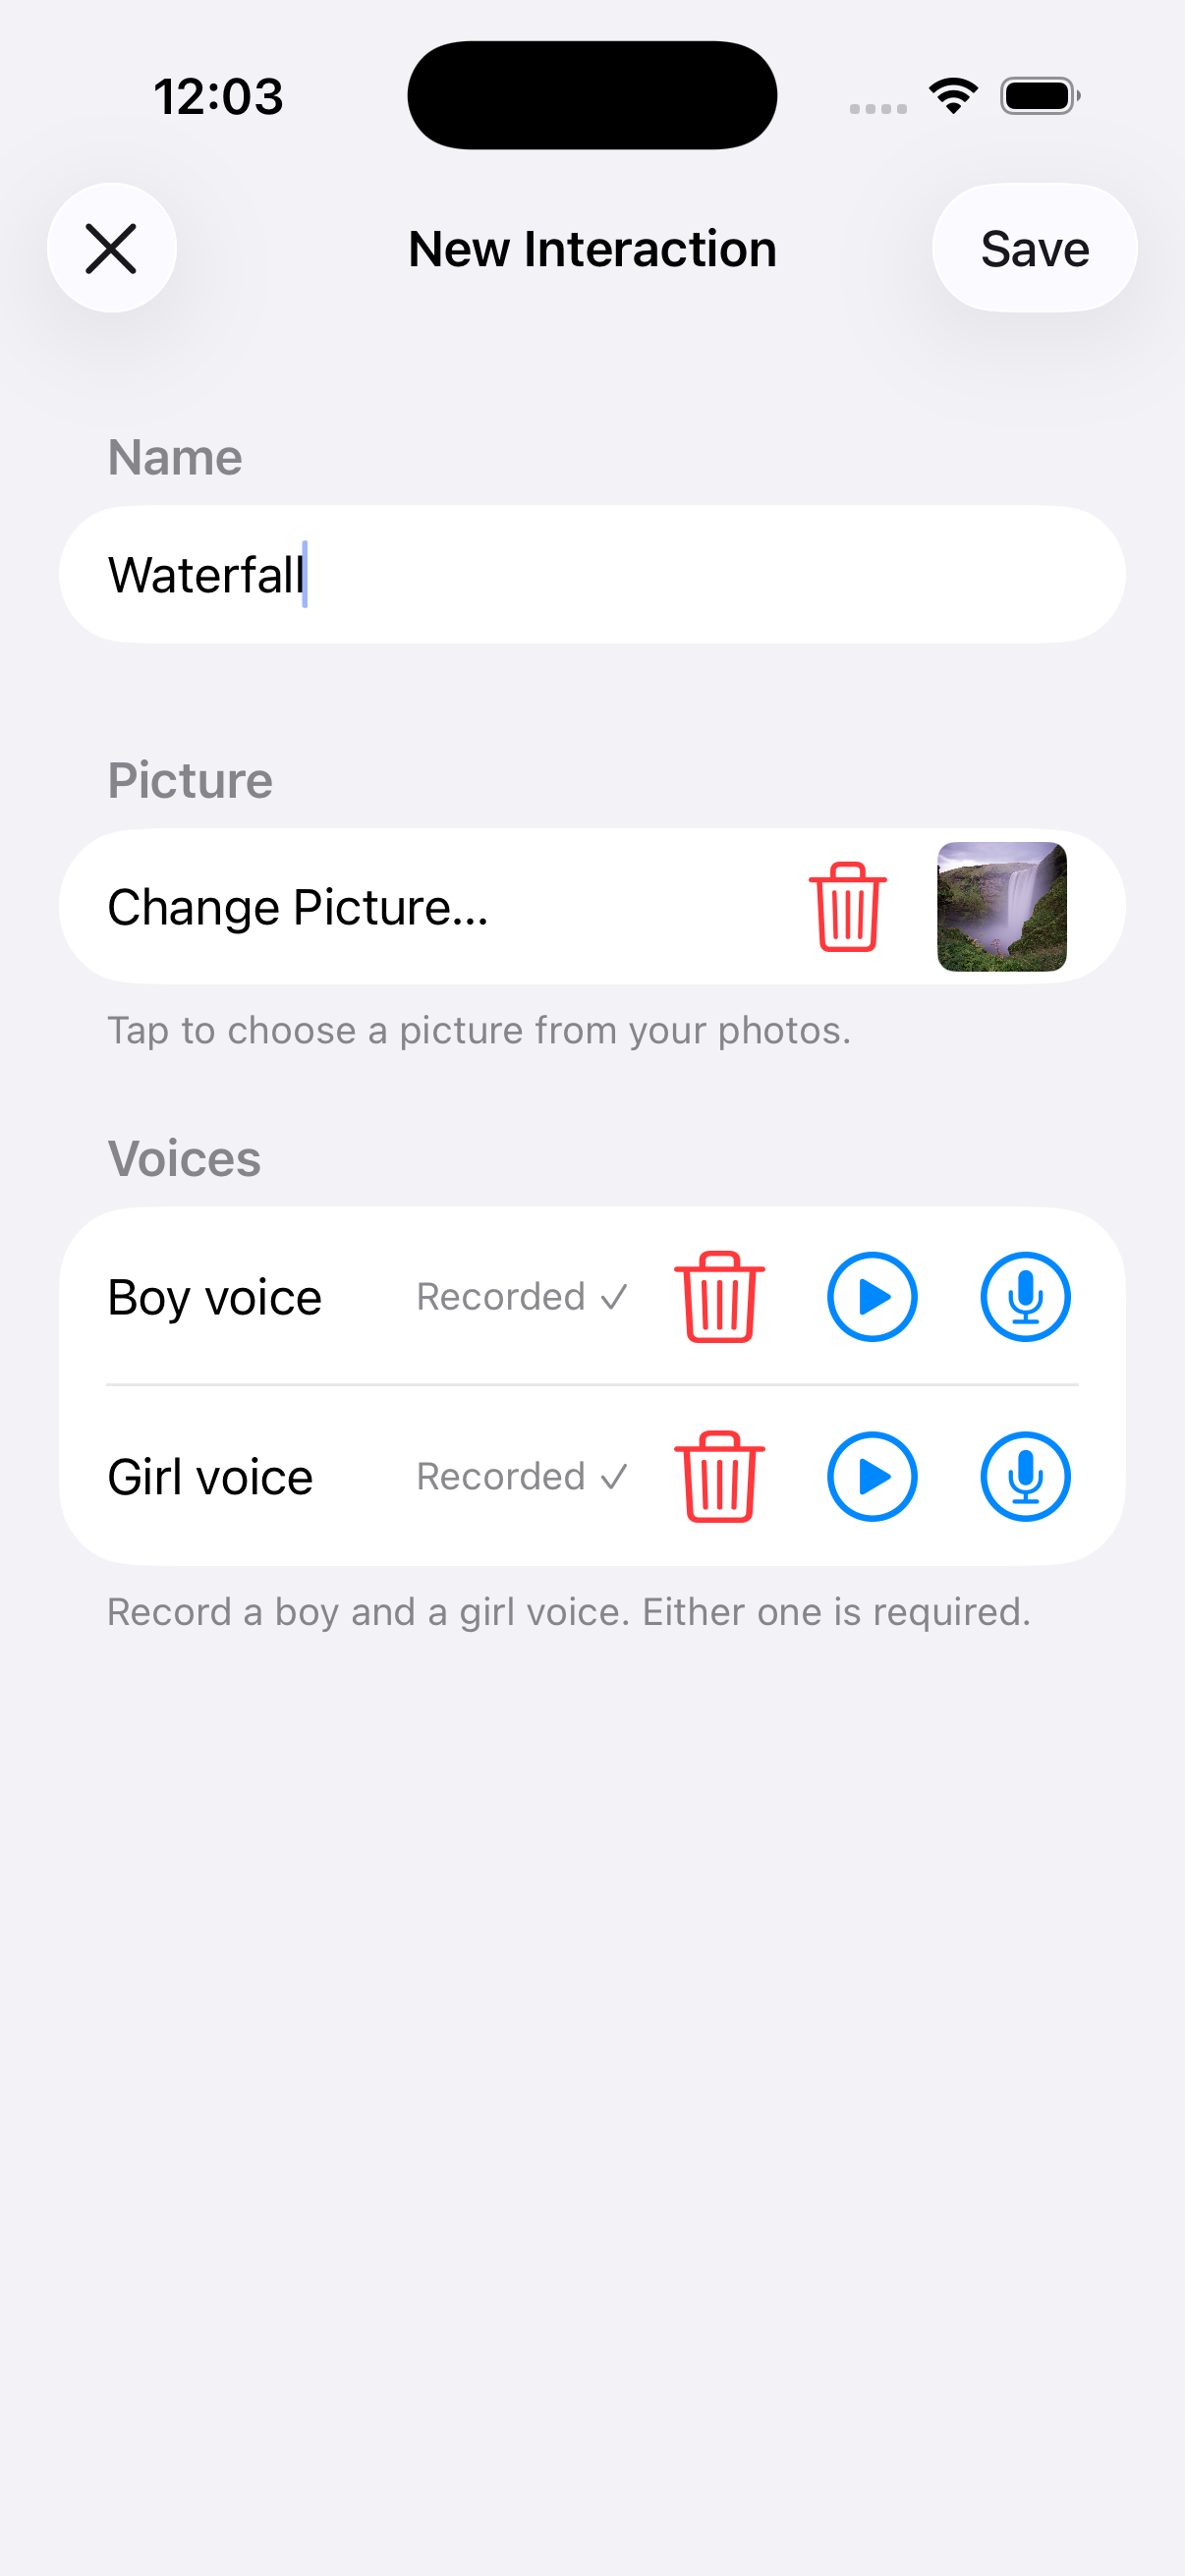
Step 3 — Add a picture and recording
Each panel can hold up to 6 pictures. For each one:
- Tap Add Interaction.
- (Optional) Type a Name — like Grandma.
- Tap Picture to choose how you’ll add the image:
- Take Photo uses your camera.
- Choose from Library picks from your photo library.
- Choose from Files imports an image file — handy for a picture you’ve downloaded, or a symbol you exported from another app (anything you have the right to use).
- Tap the red Record button, say the word clearly, then tap Stop. Tap the recording to play it back, or tap Record again to redo it.
- (Optional) Repeat the recording in the other voice slot — there’s a “boy” voice and a “girl” voice. You can fill in just one or both.
- Tap Save.
Tip: Record in a quiet room, hold the phone close to your mouth, and say the word clearly. You can re-record anytime by tapping Record again.
Edit, reorder, or delete
- To edit a panel: tap the gear icon, then tap the panel.
- To reorder panels: tap the gear icon, then drag the lines on the right of each panel up or down.
- To delete a panel: tap the gear icon, swipe left on the panel, tap Delete.
Built-in panels can’t be deleted, only hidden.
If you delete something by mistake
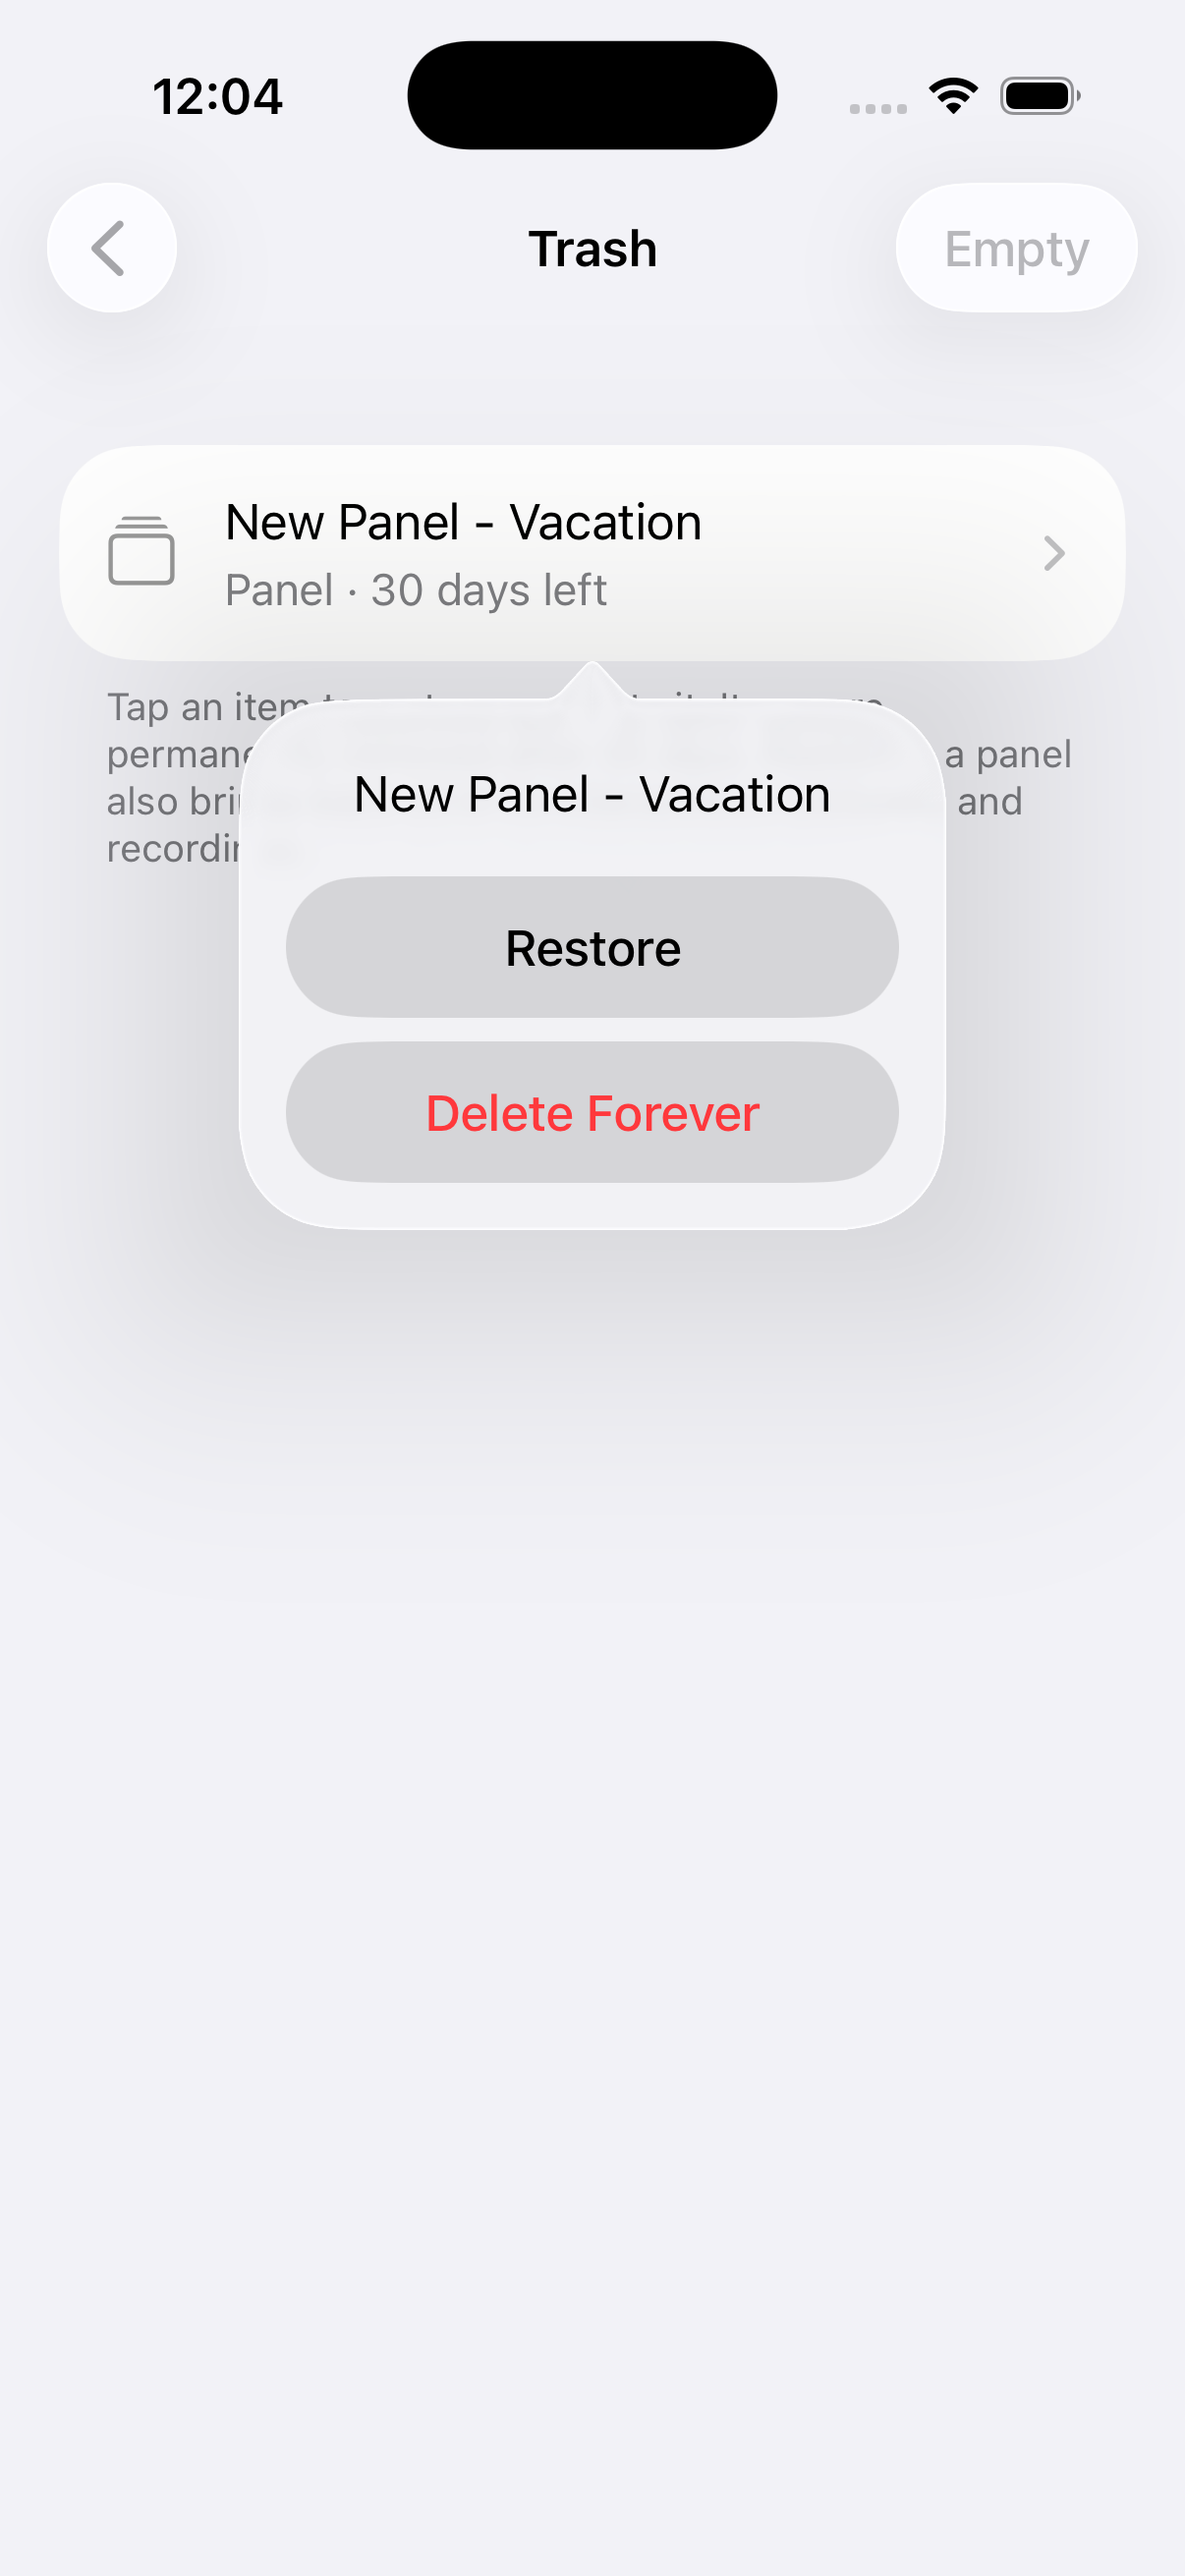
Deleted panels and pictures aren’t gone right away — they sit in Trash for 30 days, then are removed for good. To get something back:
- Tap the gear icon and type your PIN.
- Scroll to the bottom of the editor and tap Trash.
- Tap the item, then type your PIN to confirm.
- The item returns to where it was.
To clear the Trash immediately, tap Empty Trash at the bottom (asks for your PIN).
Common problems
“There’s no sound when my child taps a picture.” Check the iPhone’s volume buttons and the silent switch (the small switch on the side of the iPhone, above the volume buttons). If silent is on, you’ll see an orange line — flip it off.
“The camera shows a black screen when I try to add a picture.” The app needs your permission to use the camera. Go to Settings → iInteract → Camera and turn it on.
“The Photos picker doesn’t show all my photos.” Go to Settings → iInteract → Photos and choose All Photos.
“The microphone won’t record.” Go to Settings → iInteract → Microphone and turn it on.
“My PIN isn’t working.” Type the 4 digits with no spaces. Capital letters and small letters are treated the same.
“I forgot my PIN.” On the PIN screen, tap I forgot and answer your security question.
“My iPad isn’t seeing changes from my iPhone.” Both devices need to be signed into the same Apple ID with iCloud Drive on, and iInteract’s iCloud toggle on. Try opening the iPad app — it usually catches up within a minute.
Parent configuration
Everything below is set-it-once configuration — most parents pick these during the first-run guided setup and rarely touch them again. None of it changes what your child sees day to day; it’s all optional. Each option lives in Settings — open it either of the two ways below.
Two ways to open Settings
Every Settings option (Voice, Mode, Edit Panels, PIN, Display, Configuration, iCloud sync, Erase All My Data) is available from two places. They’re equivalent — set a value in either, and the other reflects it. Use whichever is convenient.
| Place | How to get there | When it’s handy |
|---|---|---|
| In-app Settings | Tap the gear icon ⚙️ in the top-right of the main screen, OR (in the new Long-Press Gesture mode) long-press the “iInteract” title. When a PIN is set, you’ll enter it once to unlock Settings. | Fast — no leaving iInteract. Most parents will use this. |
| iOS Settings app | iPhone’s Settings app → scroll to Apps (or down the main list on older iOS) → iInteract. | When you’re already in iOS Settings adjusting other things, or when you’ve picked Hide Gear in Configuration (the iOS Settings app is the only way to bring it back). |
Mac users get a dedicated window. On Mac, tapping the gear (or pressing ⌘,) opens Settings in its own macOS-style window rather than a modal sheet. Matches the macOS HIG for Preferences/Settings. The window auto-closes after 10 minutes of inactivity for child safety.
Your settings sync across devices. Pick a Parent Access mode (or any other setting) on iPhone, and your iPad and Mac follow on next launch via iCloud. PIN, custom panels, Mode, voice choice, the Show Words setting, and the Parent Access mode all sync automatically — no extra setup. (Requires iCloud Sync turned on in Settings, which is the default.)
One PIN unlock per session. Once you tap the gear and enter your PIN, the in-app Settings stays unlocked — Edit Panels, Change PIN, and other actions inside don’t prompt again. Erase All My Data and Disable PIN do prompt one more time as a safety check (they’re destructive and one-way).
Forgot your PIN? Every PIN prompt offers a Forgot PIN? button. Tap it, answer the security question you set when creating the PIN, and the PIN clears — no need to delete and reinstall the app.
Three modes — pick one
The app has three modes. Fresh installs land in Customize so you can add your own panels right away.
| Mode | What it does |
|---|---|
| Customize (default) | Everything Configurable does, plus add your own panels with personal photos and recorded voices. |
| Configurable | Built-in panels only — but you can rename any panel or word, hide ones you don’t want, or change their order. |
| Default | Built-in panels only, no changes. Read-only. |
Most parents stay on Customize. Switch to Default if you want a fully read-only experience.
How to switch
Tap the gear ⚙️ on the main screen → Mode → pick. Or open iPhone Settings → Apps → iInteract → Mode.
Custom panels are safe. If you switch back to Default later, your panels are saved — just hidden until you return to Customize.
Rename a built-in panel or word
The seven built-in panels and the words beneath their pictures can be renamed to match the words your child already uses — for example, change Bathroom to Potty, or the I feel panel to My feelings. Your edits sync across your devices, and you can reset to the original at any time.
- Make sure you’re in Configurable or Customize mode.
- Open the gear ⚙️ → Edit Panels.
- Tap a built-in panel (the ones labeled “Built-in”).
- Change the Panel Name, and/or any word under a picture.
- Tap Reset next to a field to restore the original wording.
- Tap Save.
Pictures and recordings on built-in panels can’t be changed here — only the words. To use your own pictures and voice, add a panel in Customize mode.
Choose a language
iInteract can show the built-in panels in English, Spanish, or Chinese. When you pick a language, the panel titles and the words under the pictures change to that language — and a picture with no recording is spoken aloud in that language too.
- Open the gear ⚙️ → Display → Language.
- Pick English, Español, or 中文.
You can also pick a language on the welcome screen the first time you open a new version. iInteract never changes your language on its own — if you’ve used the app before, it stays on whatever you had (English unless you changed it); a brand-new install starts in your device’s language when it’s one we support.
This changes the built-in panels only. Any panels, words, and recordings you added stay exactly as you typed and recorded them. The chosen language covers the on-screen words and the spoken word; the original recorded voices are in English, so translated words are spoken with your device’s text-to-speech voice for that language.
Set a parent password (PIN)
Once you’re in Configurable or Customize mode, set a 4-digit PIN. This stops your child from accidentally deleting things or changing settings.
Good news: the PIN doesn’t get in your child’s way. They can still open panels and tap pictures without it. The PIN only kicks in when you’re about to delete, empty trash, or enter the editor.
How to set your PIN
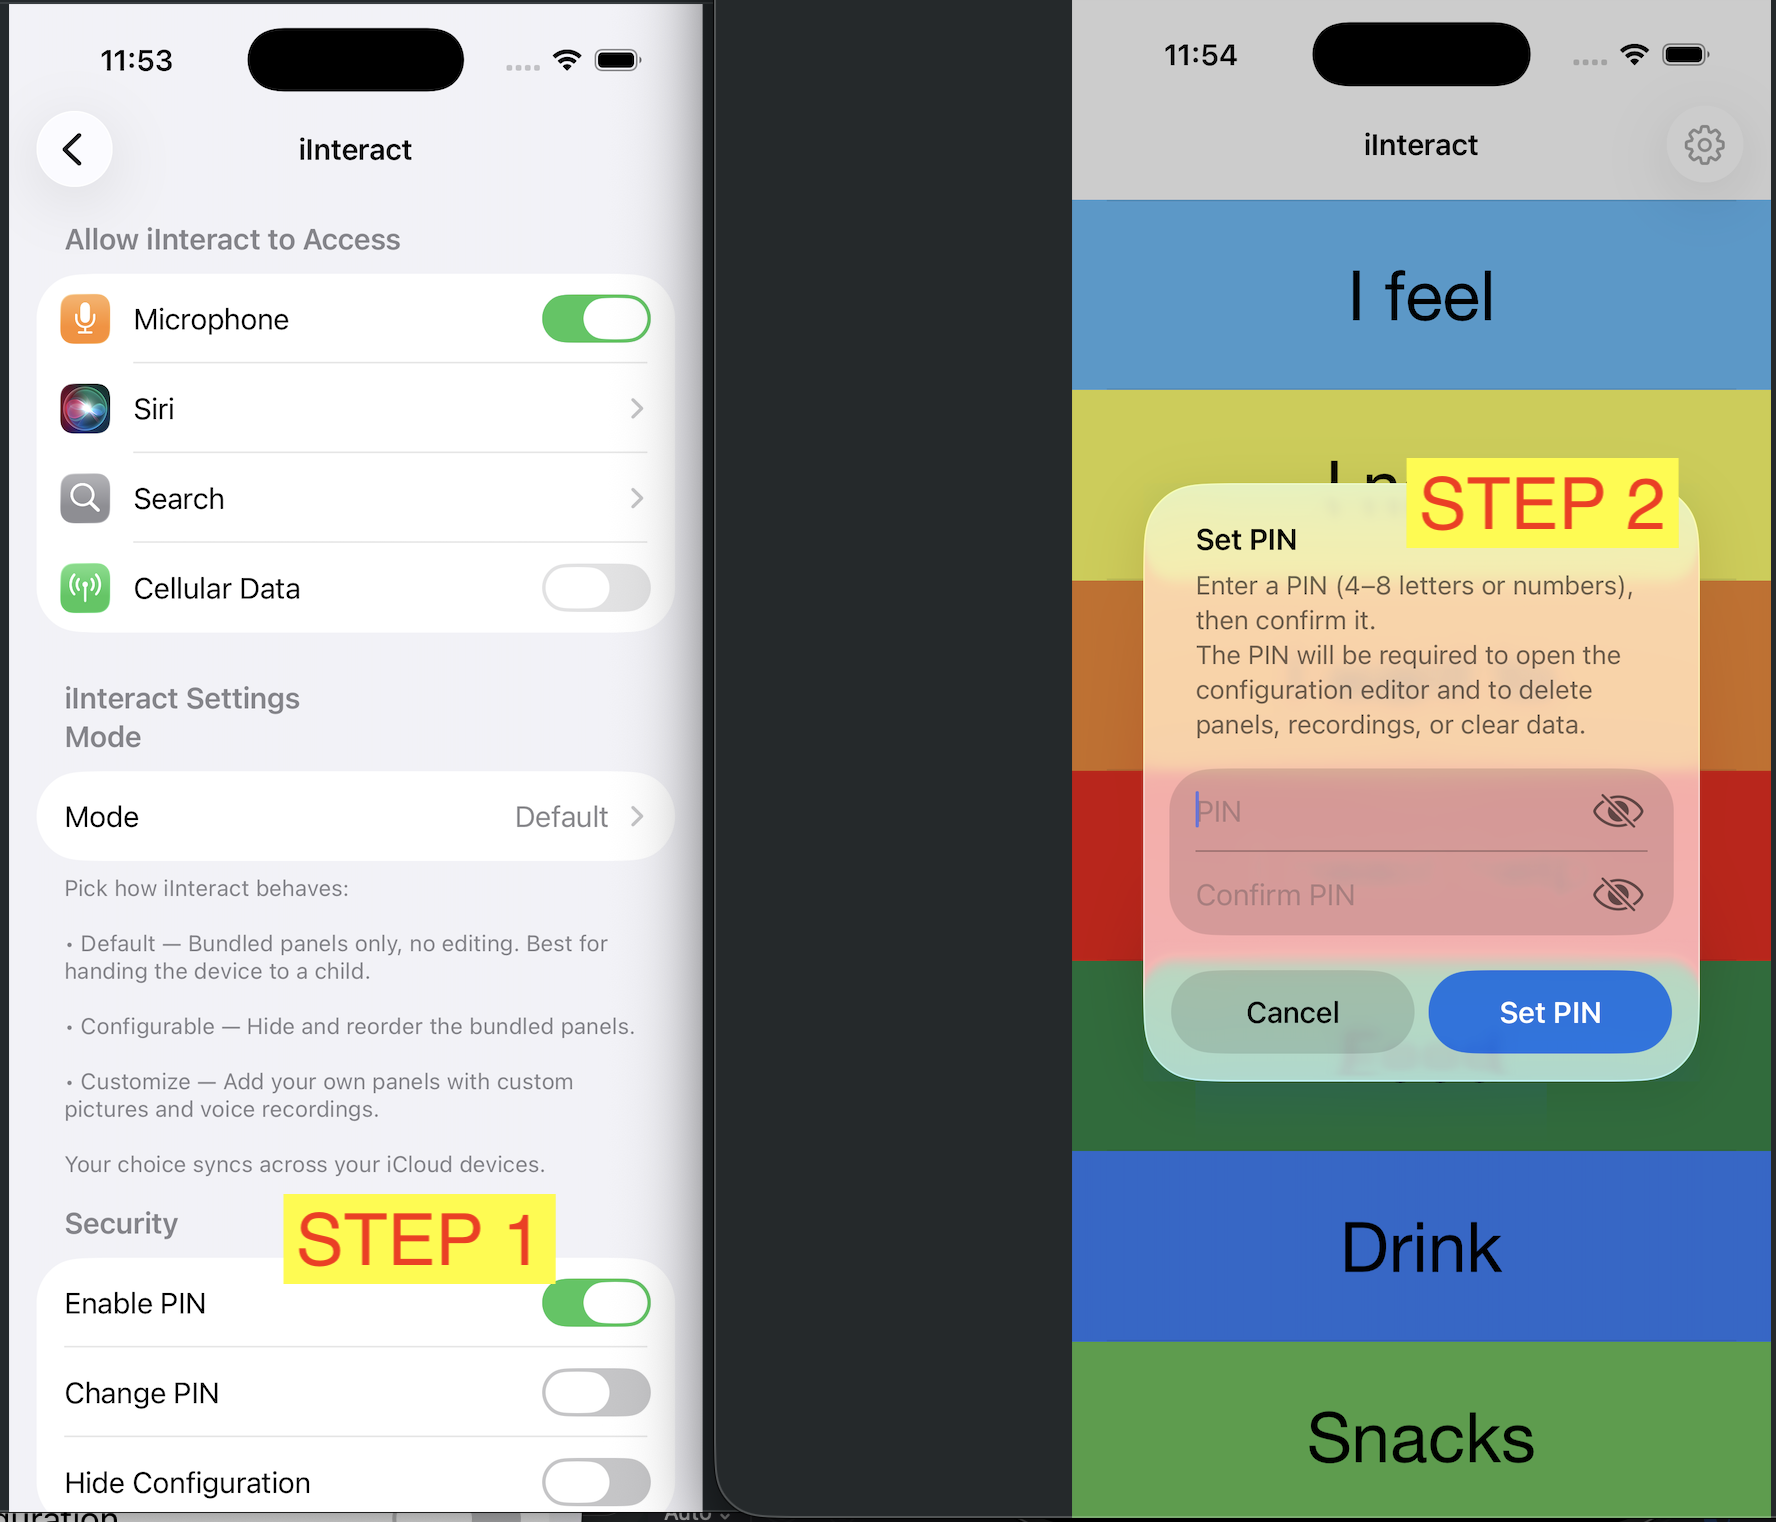
The fast way (in-app):
- Tap the gear icon ⚙️ on the main screen.
- In the Security section, turn Enable PIN on.
- Type a 4-digit number, then type it again to confirm.
- Pick a security question and type your answer (in case you forget).
- Done — the PIN is now active.
Or use the iOS Settings app → Apps → iInteract → Set PIN (same flow).
To change or remove your PIN
In the in-app Settings, tap Change PIN… below the Enable PIN switch and follow the prompts. To remove it entirely, flip Enable PIN off (you’ll be asked to confirm with your current PIN). Forgot it? Tap I forgot at any PIN prompt and answer your security question.
What the PIN looks like in the app
When you’re about to do something the PIN protects, you’ll see a screen like this:
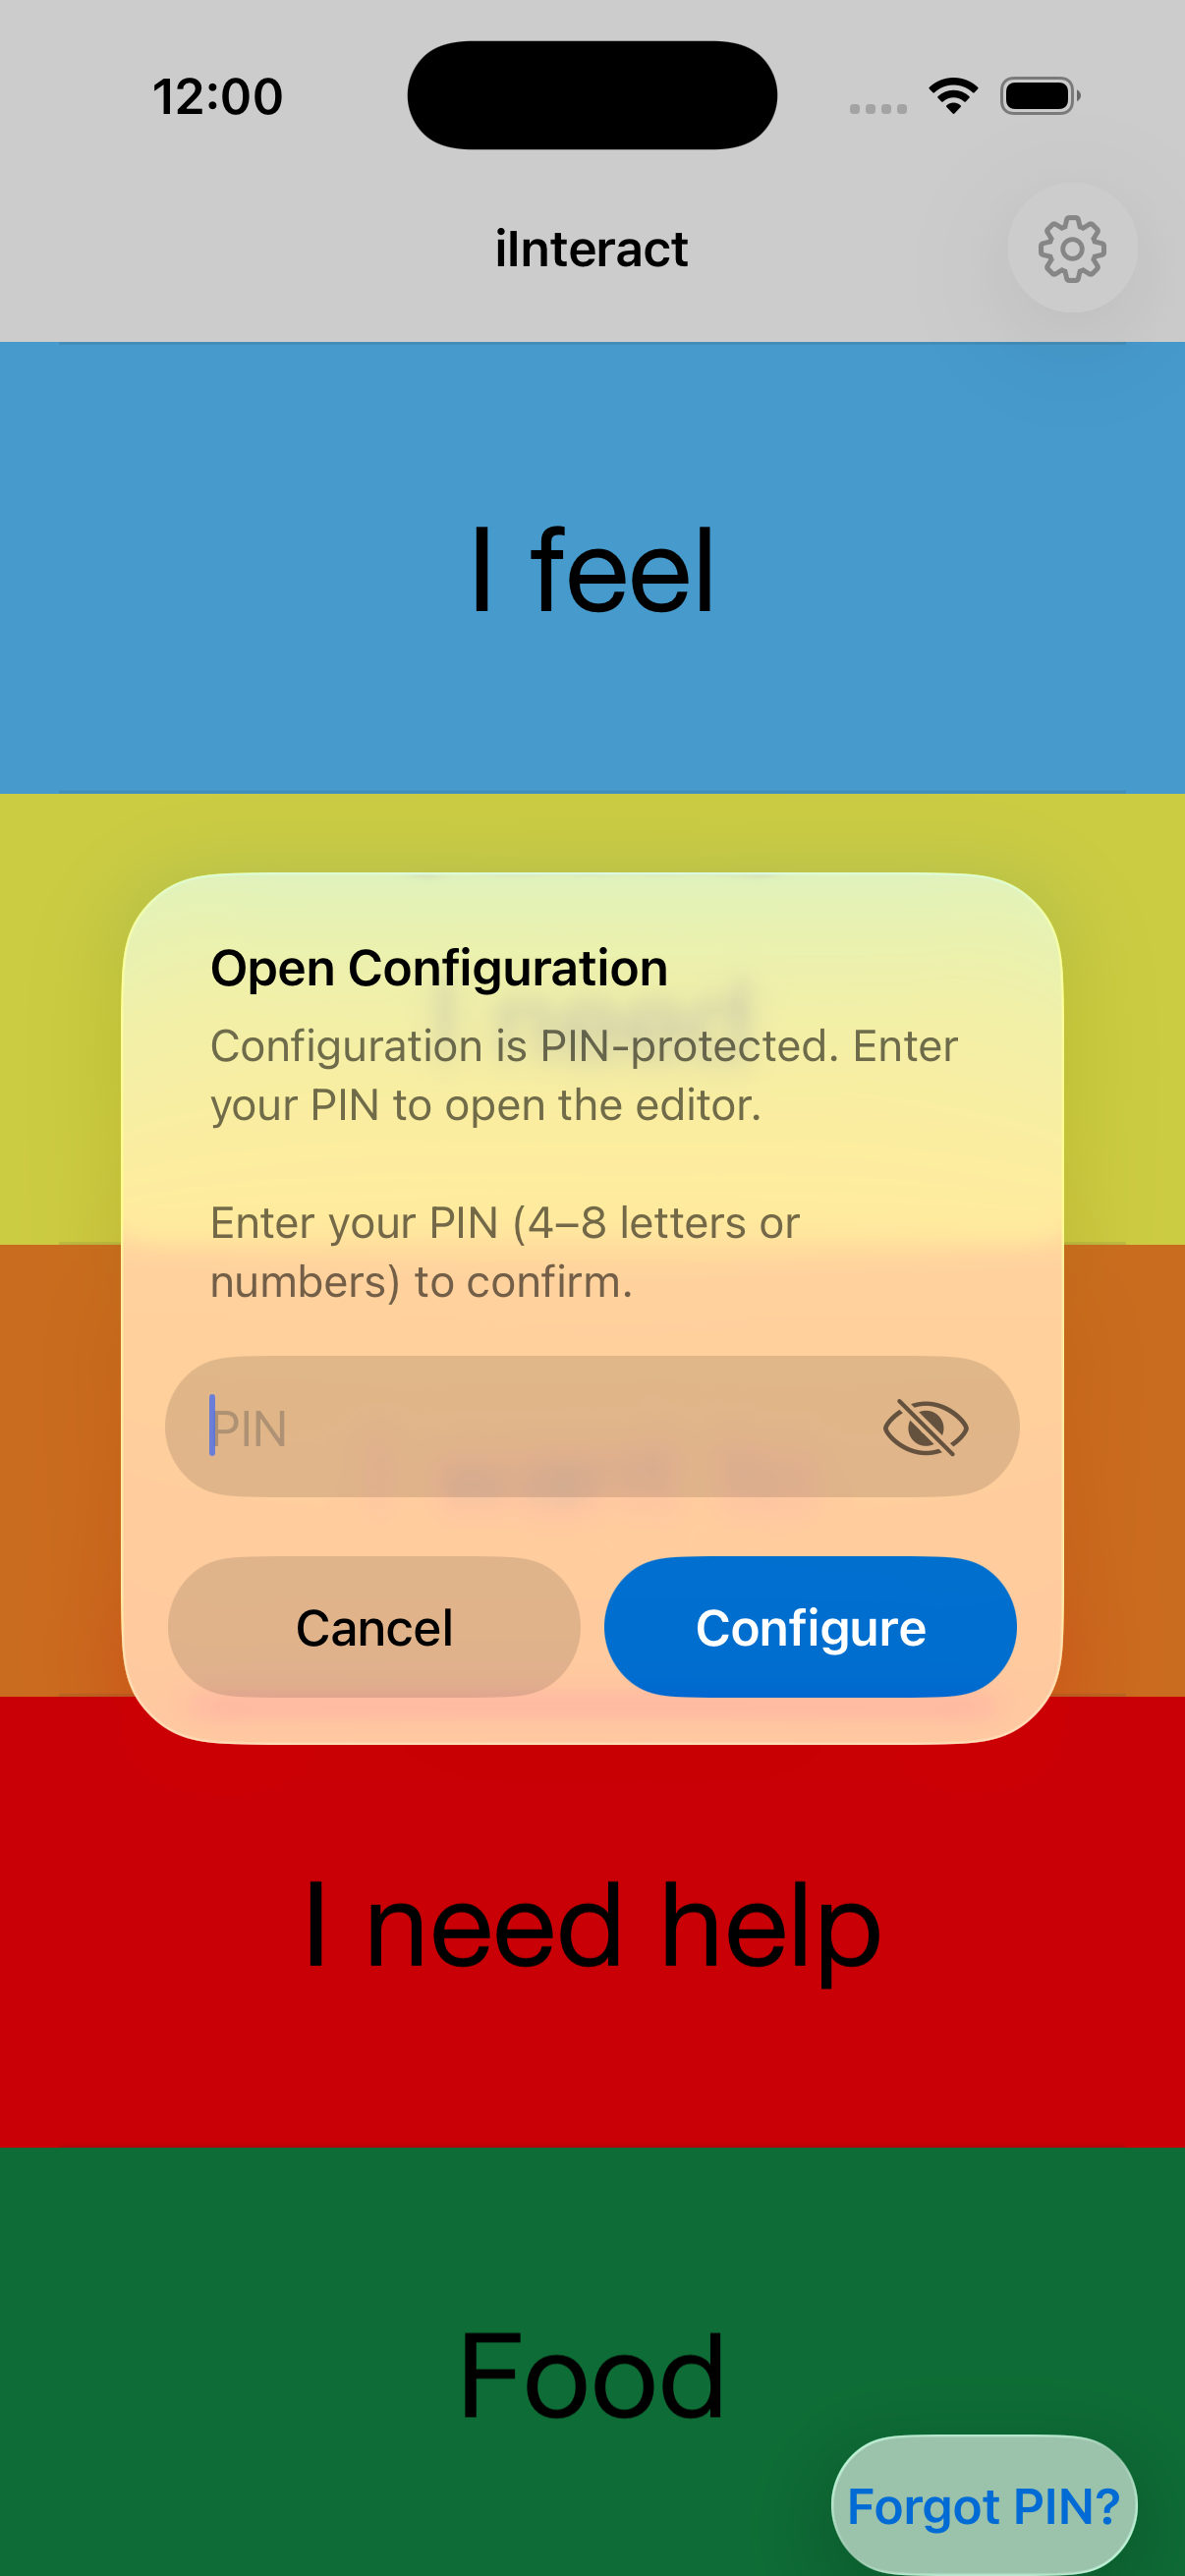
Type your 4 digits and tap OK. If you forget, tap I forgot and answer your security question.
Show Words Under Pictures
New in v3.5. iInteract can print each picture’s word right underneath it, so your child sees the symbol and the word together. This helps early readers connect the picture to the printed word.
The setting is on for fresh installs. You can turn it off any time if you’d rather show pictures only.
How to turn it on or off
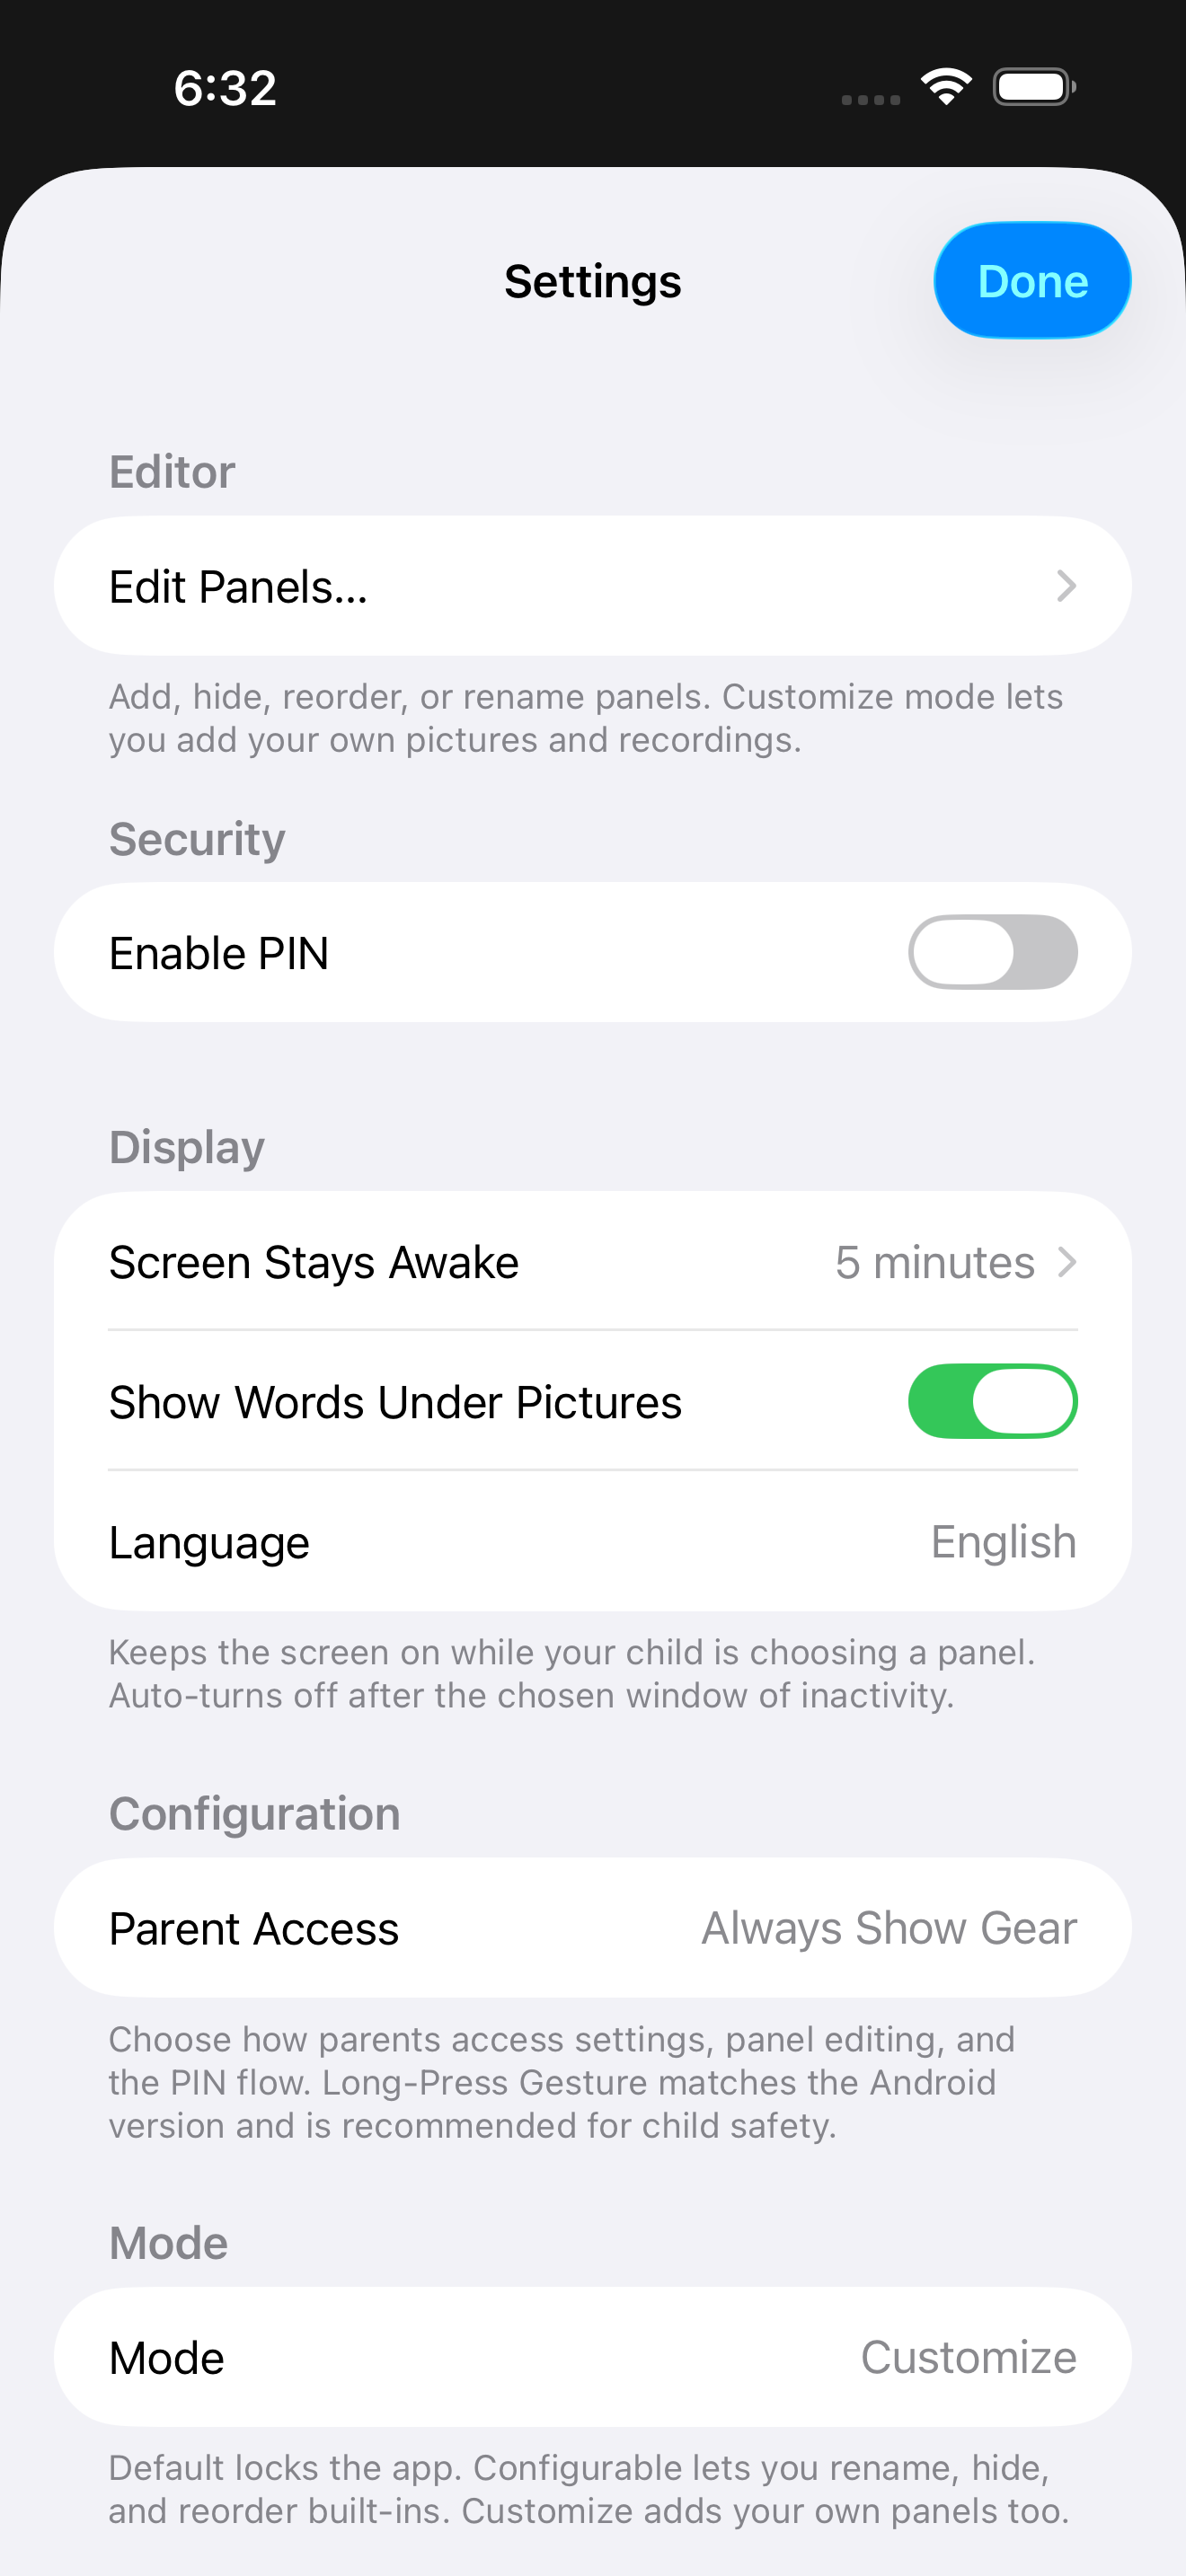
- Tap the gear icon ⚙️ on the main screen.
- Scroll to the Display section.
- Tap Show Words Under Pictures on or off.
It applies to both the built-in panels and any panels you create. The choice syncs across your devices through iCloud, so your iPhone, iPad, and Mac all match.
Parent Access — how the gear shows up
Pick whichever fits your family. On a fresh install you’ll see a one-shot Parent Access prompt right after the PIN step that highlights the recommended option.

| Mode | What it does |
|---|---|
| Long-Press Title (recommended) | Gear hidden in kid view. Long-press the “iInteract” title to enter Edit Mode. Auto-locks back to kid view after 10 minutes. |
| Always Show Gear | Gear stays visible. PIN gate (if set) protects the tap. |
| Hide Gear | Gear gone entirely. To bring it back, open iPhone Settings → Apps → iInteract → Parent Access. |
Switch any time: gear → Configuration → Parent Access.
Long-Press Gesture — what it feels like
- Press and hold the “iInteract” title for about 1 second. Soft haptic.
- Enter your PIN if set (with Forgot PIN as recovery).
- The gear appears in the top-right — tap to reach Settings.
- Tap the lock 🔒 (next to the gear) to exit Edit Mode, or just walk away — kid view auto-returns after 10 minutes.
Keep the screen on while my child uses iInteract
Children who use a communication board often need long, deliberate look-time before they tap — sometimes 30 seconds or more of studying the panel before choosing. iOS’s default screen timeout (about 30 seconds) can dim or black out the screen right in the middle of that thinking pause, which interrupts the flow and confuses the child.
iInteract has a built-in setting that keeps the screen on while your child is choosing.
How to set it
- Tap the gear icon ⚙️ on the main screen.
- Scroll to the Display section.
- Tap Screen Stays Awake.
- Pick one of:
- 1 minute — fast auto-dim, matches normal iPhone behavior.
- 5 minutes (default) — gives kids extra pause time to choose.
- 10 minutes — for kids who study the panel a long time.
- Until I leave the app — never auto-dims while iInteract is open. (Best paired with Guided Access — see below.)
The setting only affects iInteract — your iPhone’s normal auto-lock still works everywhere else. When you leave iInteract (Home screen, switch apps, etc.) the screen returns to your iPhone’s normal timeout.
Lock the app for your child (Guided Access)
The PIN keeps your child from changing things inside iInteract. Guided Access — a free feature built into every iPhone and iPad — keeps your child inside iInteract in the first place. While Guided Access is on, the home gesture, app switcher, Control Center, and iOS Settings are all blocked, so a tap that would normally exit the app does nothing. This is the standard way special-education apps recommend handing the device to a child.
You don’t have to install or buy anything. Guided Access is built into iOS. Apple’s own documentation describes the same steps below.
Set up Guided Access (first time only)
- Open the iPhone’s Settings app.
- Tap Accessibility.
- Scroll down to Guided Access and tap it.
- Turn on the Guided Access switch.
- Tap Passcode Settings → Set Guided Access Passcode and pick a 4-digit code. Use a different code than your iPhone unlock code — this one is just for ending Guided Access.
Use it before handing the phone to your child
- Open iInteract.
- Triple-click the side button (or the home button on older iPhones).
- The Guided Access setup screen appears. Strongly recommended: drag a finger across the gear icon in the top-right corner to draw a circle around it — that disables taps in that exact region for the entire Guided Access session. (More on this below.)
- Tap Options in the bottom-left if you also want to disable hardware buttons (Volume, Sleep/Wake, etc.) or the touchscreen entirely.
- Tap Start in the top-right.
- iInteract is now locked in. Hand the phone to your child — they can tap panels and hear words, but the home gesture and other apps are unreachable.
The two ways to prevent gear taps during Guided Access
This is the most-asked-about scenario. There are two non-overlapping tools:
| Tool | What it does | When to use |
|---|---|---|
| Draw a circle around the gear (this section, step 3) | iOS feature. Any tap inside the circle is ignored for the session. Doesn’t change anything when the session ends. | Quick, no-setup. Recommended for most parents. |
| Lock Editor toggle (next subsection) | iInteract feature. The gear stops responding to taps for the session. Shows a brief explanatory alert if tapped. | When you want a clean “ignored, with feedback” rather than a circle outline visible on screen. |
Either one is enough. They can be combined.
To take the phone back
- Triple-click the side button again.
- Type your Guided Access passcode.
- Tap End in the top-left.
- The phone returns to normal.
iInteract’s “Lock Editor” toggle
When you’re in Guided Access setup (step 4 above), tap Options. You’ll see an iInteract section with a Lock Editor toggle. Turn it on and the gear icon stops responding to taps for the entire Guided Access session — even without drawing a circle around it. Tapping the gear briefly shows an alert explaining the lock; nothing else happens. This is the most common request from parents who want zero risk of editor access while their child is using the app.
Tip: PIN and Guided Access are independent. You can use either, both, or neither. Most parents end up using both — PIN for quick “I’m just handing over for 30 seconds” cases, Guided Access for “child is using the app for 20 minutes while I’m in the next room.”
Use it on more than one device
If you have iInteract on more than one device — say an iPhone and an iPad — turning on iCloud keeps them in sync. Add a panel on your iPhone, and it shows up on your iPad a minute later.
How to turn iCloud on
The fast way (in-app): tap the gear icon ⚙️ → in the iCloud section, turn Sync via iCloud on. Repeat on your iPad (or Mac).
Or from iOS Settings → Apps → iInteract → iCloud toggle.
Both devices need the same Apple ID. If you’re not sure, open Settings on each device — your name should be at the top.
A few small things to know:
- Changes can take a minute to show up on the other device.
- PIN, Voice, Mode, Show Words, and Parent Access all sync too — pick once on any device, the others follow on next launch.
Turning sync off
Turning Sync via iCloud back off is a protected action, since it stops your devices from sharing data. If you set a PIN, you’ll enter it first, then type the word STOP to confirm. (iCloud sync is an iPhone/iPad/Mac feature; the Android version stores everything on the one device.)
Erase All My Data
If you want a fresh start — give the iPhone to a new family member, donate the device, or just clean out a panel mess you don’t want to fix one row at a time — there’s a wipe in Settings.
This deletes everything: every custom panel, every picture you took, every voice recording you made, every item in the Trash, and the PIN. The bundled built-in panels are untouched. It also deletes the same data from your iCloud account, so a second iPhone or iPad signed into the same iCloud sees the cleared state too.
How to wipe everything
The fast way (in-app):
- Tap the gear icon ⚙️ → scroll to the bottom.
- Tap Erase All My Data… (the red row in the Privacy section).
- If you set a PIN, you’ll first enter it and tap Continue.
- Type the word
ERASEin the box to turn on the red erase button — this extra step makes sure the wipe never happens by accident. - Tap the erase button. One last “Erase Everything?” warning appears — tap Erase to confirm (or Cancel to back out). Nothing is deleted until you tap that final Erase.
Or from iOS Settings → Apps → iInteract → turn on Erase All My Data on Resume, then open iInteract — the same PIN-then-type-ERASE confirmation runs on next launch.
Recovery
The wipe is permanent. There’s no undo and no Trash recovery for items wiped this way (the Trash itself is also cleared). If you might want anything back, restore it from the Trash before triggering the wipe.
Privacy
Your panels, pictures, and recordings stay on your devices. If you turn on iCloud, they’re stored in your private iCloud account — locked so even Apple can’t open them. iInteract has no advertising, no analytics, and no third-party services.
For the full details, see the Privacy Policy.
More help
- For bug reports or feature requests, leave a review on the App Store — Jim reads every review and can respond directly through App Store Connect.
- iInteract is proprietary software. Copyright © 2010 – 2026 Jim Zucker, Cathy DeMarco, Tricia Zucker. All rights reserved. See LICENSE.